This guide’s screenshots and navigation steps describe the website. For app setup, offline use, and purchases, see iPhone, iPad & Android. Screenshots show sample records. Account names have been replaced with “Free account” or “Pro account.” Select a screenshot to open the full image. On a phone, scroll to the topic list or use your browser’s Find on Page.
No matching topics. Try a shorter phrase, such as “photo,” “vehicle,” or “password,” or clear the search to browse everything.
After signing in, use New Entry to record a stay, Trip Log to revisit saved stays, Vehicles for fuel and service records, Planner for future ideas, and Feed for travelers you follow.
Open the account menu beside your name for Account & Settings, Expenses, Checklists, Road Trips, Guides, Feature Ideas, Trash, and Logout. On smaller screens the navigation may wrap onto more than one row.
If you share a log, check the profile selector before adding or changing anything. Your own log and a collaborator’s log are separate destinations.
A stay is a visit you record in your journal. A planner idea is a future possibility. A road trip groups saved stays into one journey. Creating one does not automatically create the others.
Open the app and sign in with your existing RV Log account, or create an account. Your Free or Pro access follows your RV Log account between the website and app.
Use the app’s tabs and More menu to find your records, plans, and settings. Website menu names and screenshots elsewhere in this guide may differ from the app.
Allow location or photo access only when you want to use those features. You can also enter a location manually.
For Apple subscriptions, open More → RV Log Pro. Choose a monthly or yearly option and review Apple’s price and renewal terms before purchasing. If you already have active Pro access, sign in to that RV Log account rather than buying a second subscription.
To recover an Apple purchase, use More → RV Log Pro → Restore Purchases with the same RV Log account and Apple Account used to purchase. Manage or cancel it in Settings → your name → Subscriptions on your iPhone or iPad.
When you lose connection
The app can save new stays, fuel records, maintenance entries, expenses, and vehicle reminders on your device and sync pending records when you reconnect. Previously cached records may remain available. Sign-in, purchases, maps, and other features require an internet connection; the app does not make every feature available offline.
Check pending records have synced before signing out or removing the app. Records waiting on your device may not yet be available on the website or another device. The website requires an internet connection.
Free is suitable for keeping a campsite journal. Pro adds planning and vehicle tools, more photo capacity, and deeper ways to explore your history. New accounts include a Pro trial; check Account → Subscription for your current access and trial dates.
Website features at a glance
Feature
Free
Pro / active trial
Trip entries, campsite details & GPS records
Included; unlimited entries
Included
Photos per stay
2
10
Total photo storage
100 MB
Unlimited storage
Shareable postcards & public profile settings
Included
Included
Travel expenses & expense CSV export
Included
Included
Interactive trip map & detailed statistics
Pro required
Included
Create planner ideas, road trips & checklists
Pro required
Included
Add or edit vehicles, fuel & maintenance
Existing records are view-only
Included
Maintenance reminders & optional Magic Notes
Pro required
Included
Working in a shared profile can change which tools you can use: access also depends on the owner’s plan and your permissions. An upgrade prompt does not give access by itself. Read the page’s explanation and confirm the selected profile.
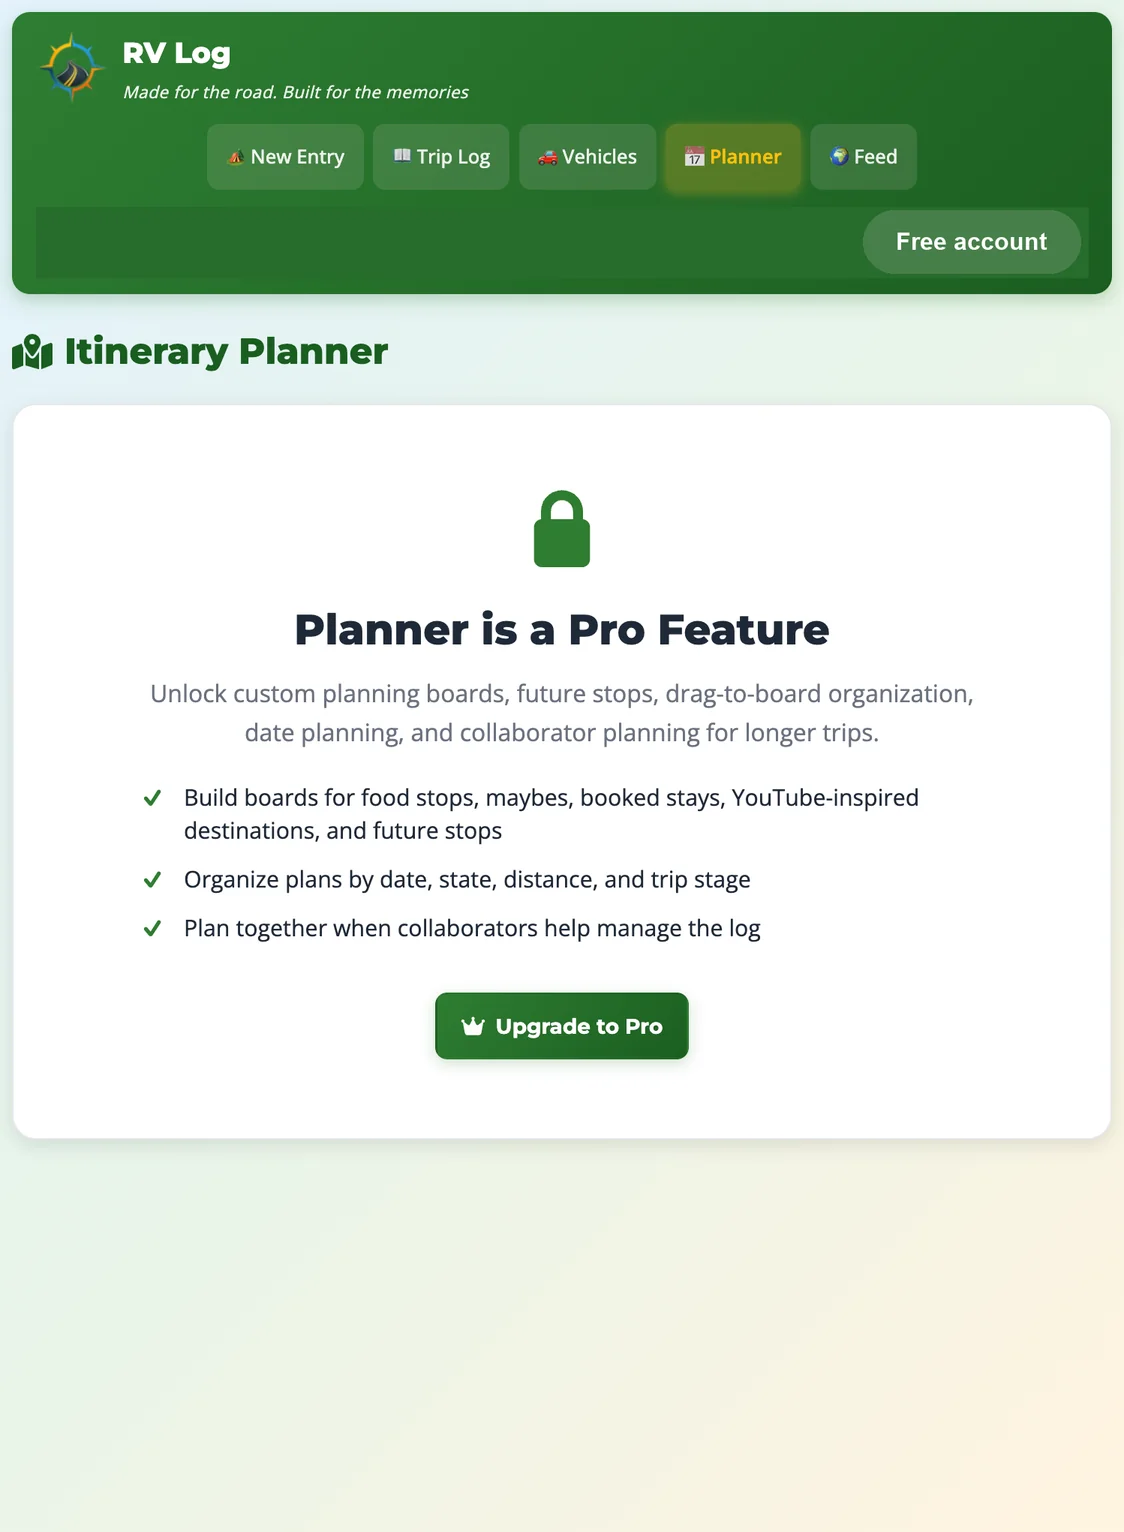
Screenshot: what a Free account sees in PlannerA Pro tool may show an explanation and upgrade button while the trip journal remains available.
Open Create an Account. Enter your username, email address, password, and matching confirmation. Follow the password requirements shown on the form.
Add a referral code if someone gave you one. Review the age confirmation, terms, and privacy policy, then complete the security verification and submit.
Check your inbox for the verification email. Open its link to verify the account. If it is missing, check spam and use Resend Verification.
Wait for the security verification to finish, then choose Login.
If you enabled two-factor authentication, complete one of your available second steps. Your account may open New Entry or Trip Log, depending on your saved preference.
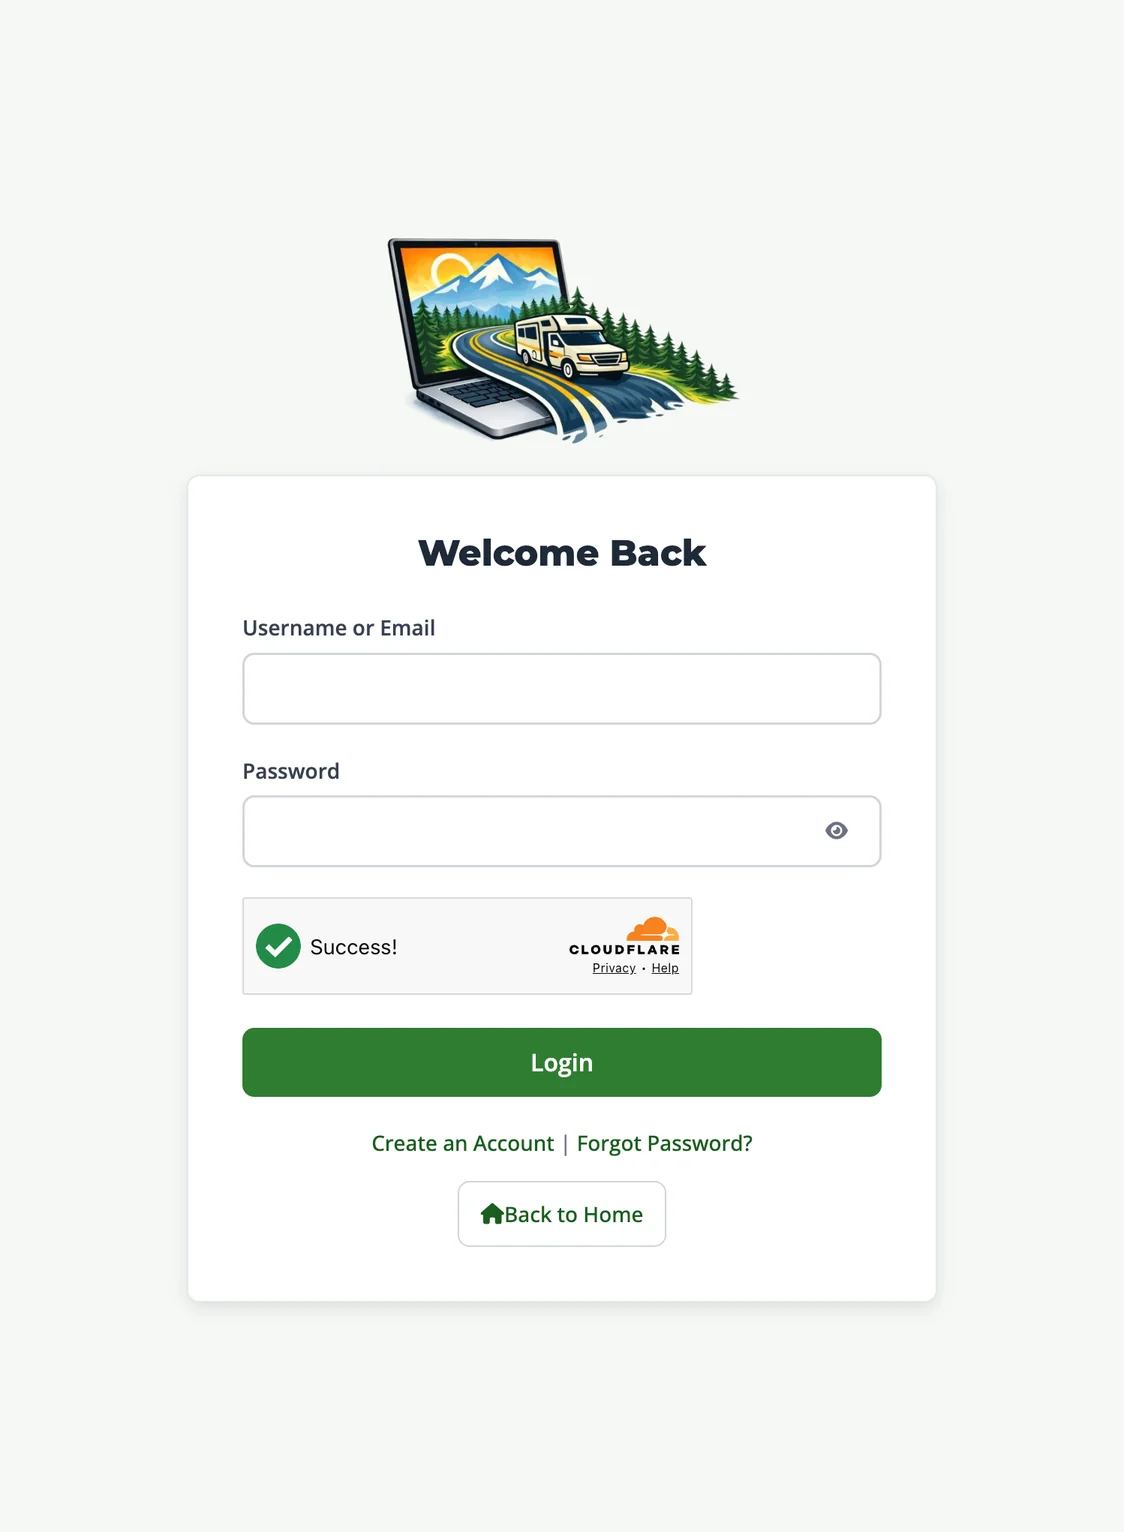
Screenshot: the sign-in pageUse your own account details. The eye button controls whether the password is visible.
Forgot your password? Choose Forgot Password?, enter your account email, and follow the email instructions. Keep reset links and verification messages private.
Open the account menu, then Account & Settings → Personal & Contact. Set your display name, preferred time zone, measurement units, and email preferences. Save the relevant form.
In RV & Travel, record RV details, travel style, and memberships you use. These preferences help you record useful details during a stay.
In Settings & Security, choose your appearance, landing page, default entry visibility, default entry style, and cost unit. Each card has its own save button.
Choose Detailed for site, amenity, and connectivity fields, or Simple for core stay details. The Entry mode selector in New Entry changes just that entry.
Keep default visibility on Private if you want to decide what to share after recording each stay. A browser theme override can differ from your account’s saved default; use Use Account Default Here to follow the account preference again.
Start at New Entry. Fields marked with an asterisk are required. You can leave optional details for later.
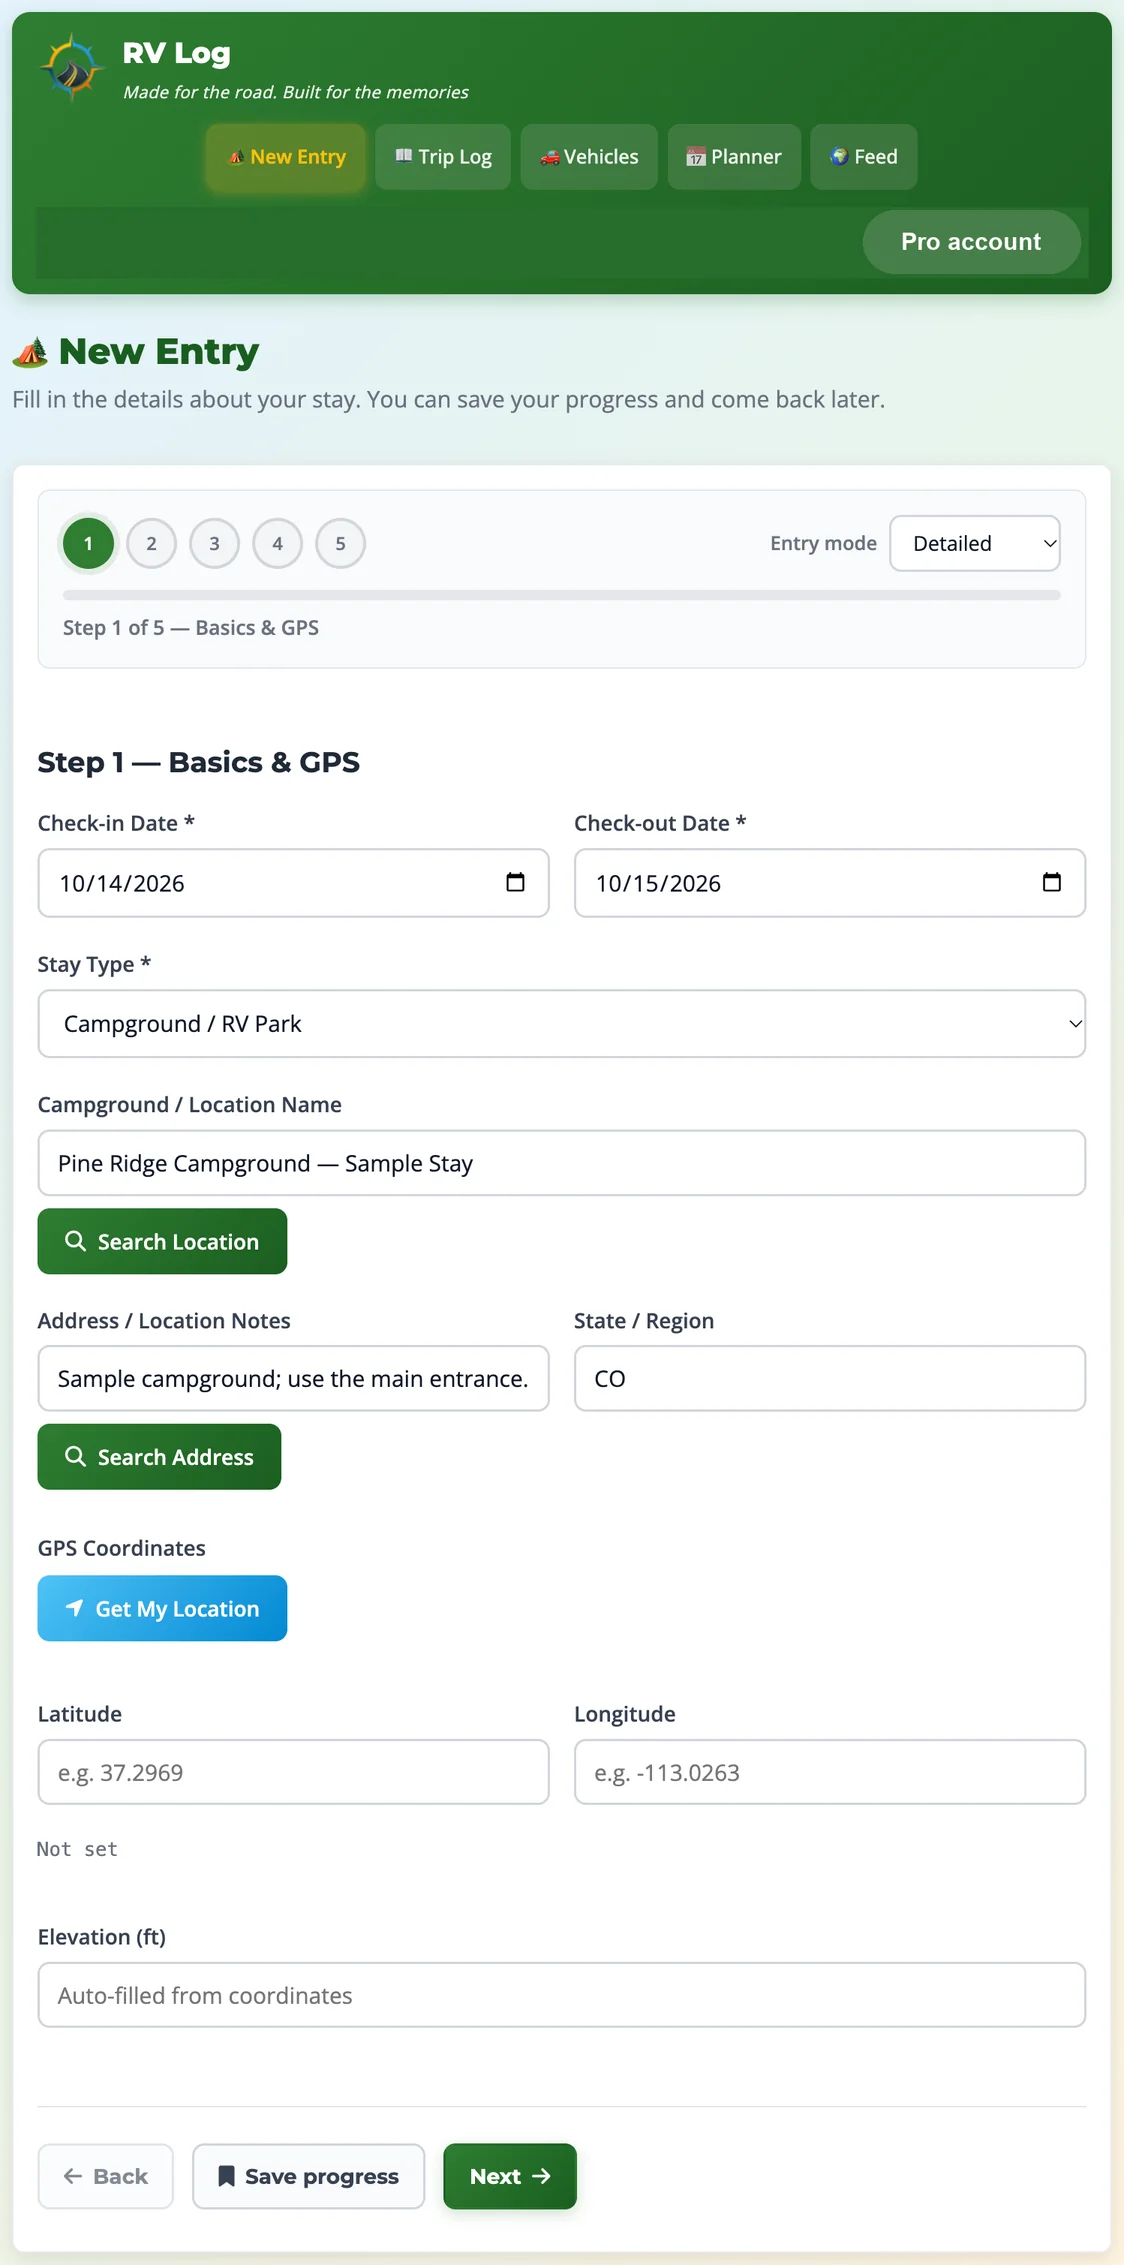
In Basics & GPS, choose check-in and check-out dates and a stay type: Campground / RV Park or Boondocking / Free Camp.
Enter a campground or location name. Use the location/address search if helpful, select the matching result, and check the filled-in details. Add access notes and state/region as needed.
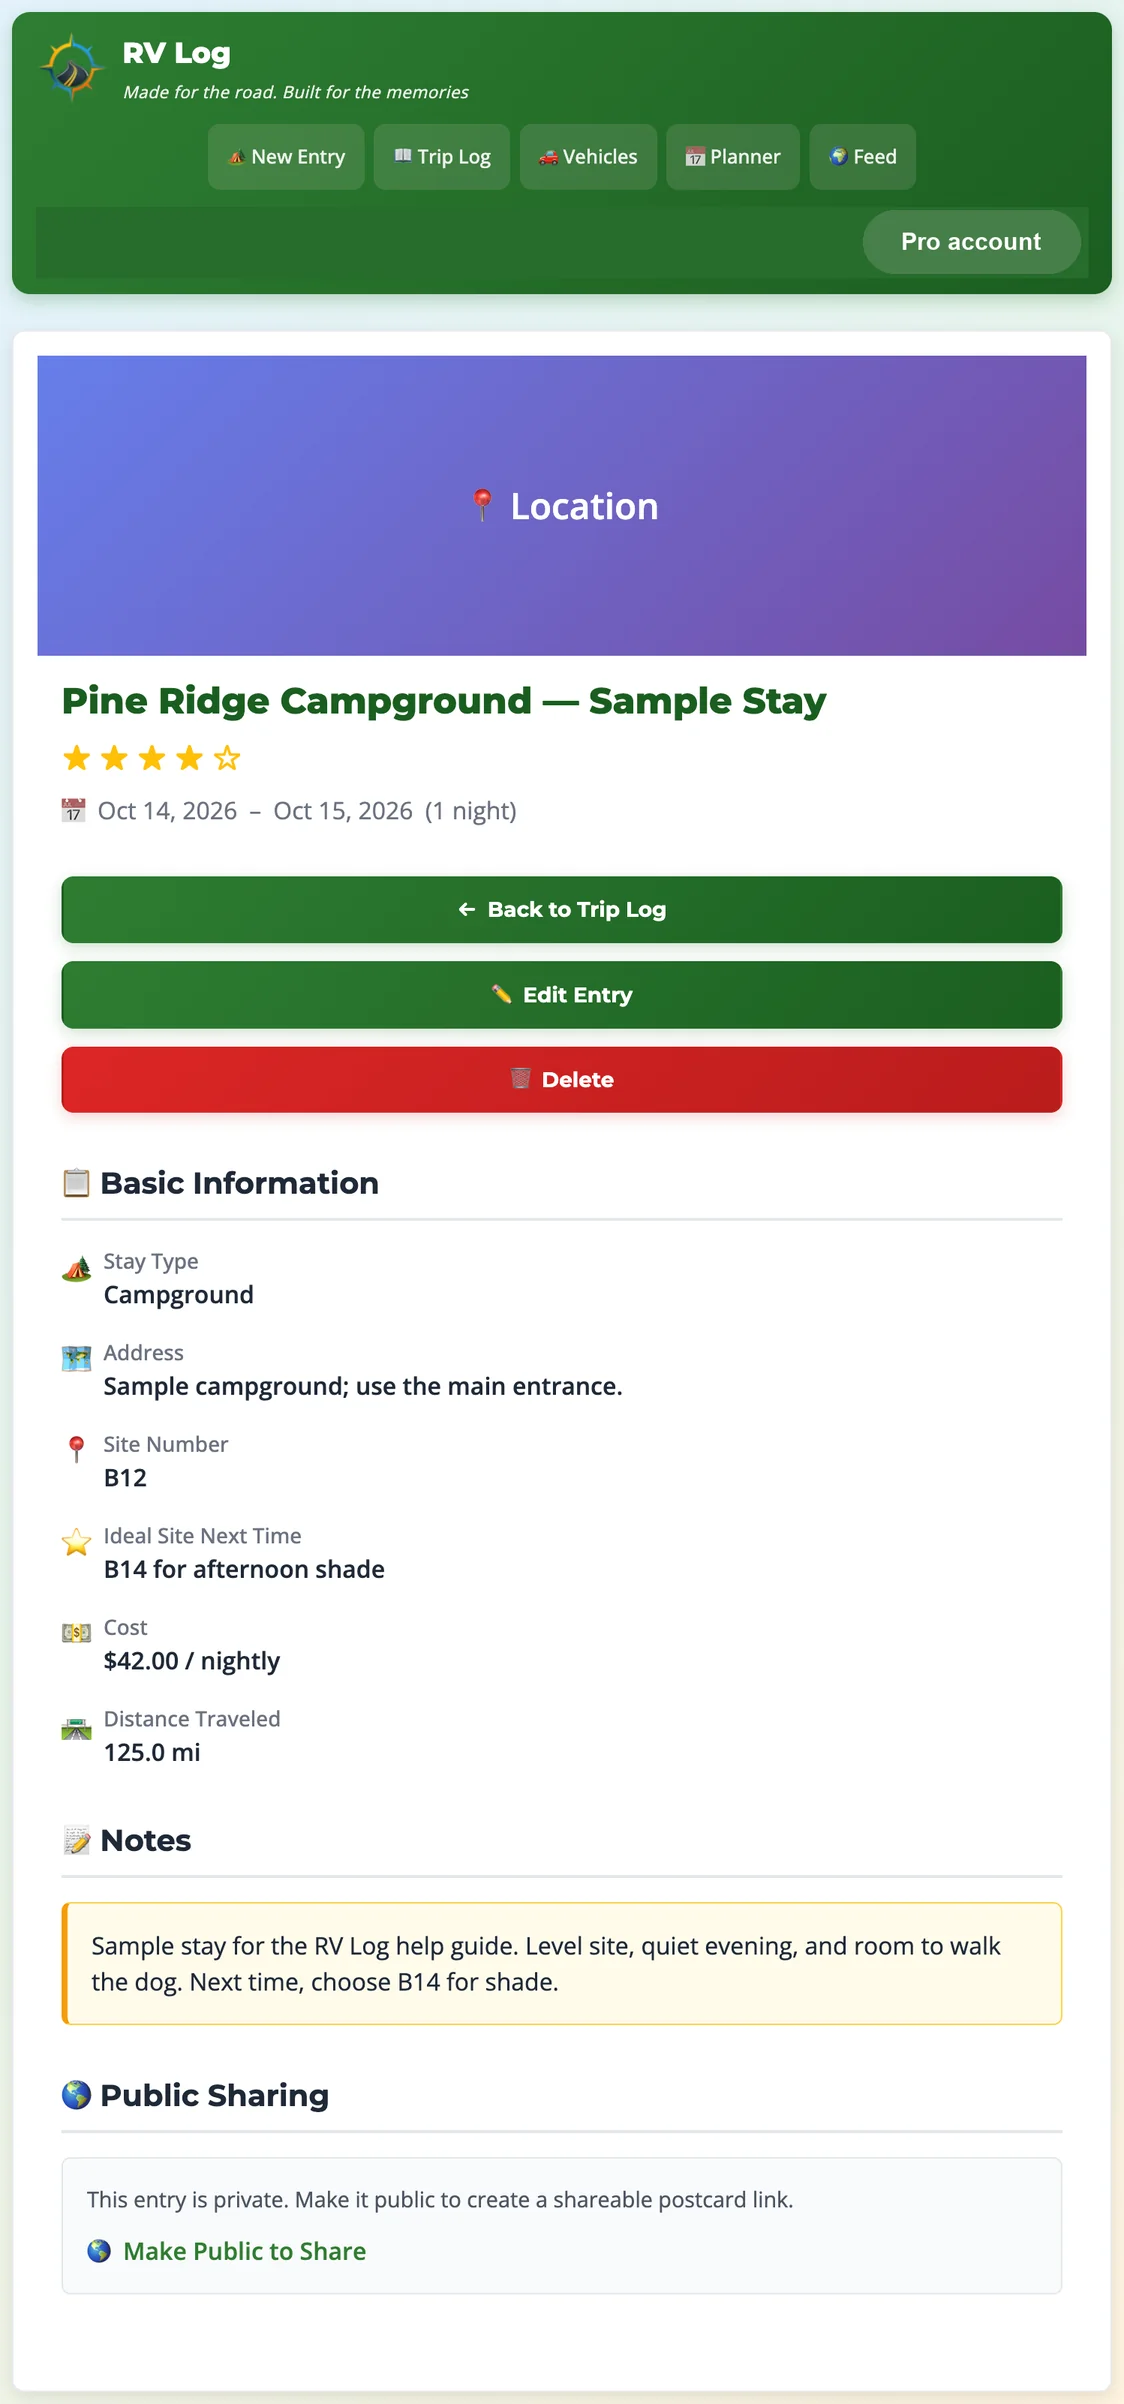
Choose Next. In Site Details, add cost and its unit, site number, the site you would choose next time, and distance traveled. For example: $42 nightly, site B12, and 125 miles.
Continue through Amenities and Connectivity if those fields are useful for this stay. See what to record.
In Ratings & Notes, add your rating, whether you would return, and practical notes. Review the public-sharing choice. Leave it off to keep the stay private.
Choose Save Entry and wait for the saved confirmation. Use Trip Log to open the saved stay. To upload photos next, select Take me to add photos after saving before saving.
Save progress saves an unfinished draft so you can resume in New Entry. It does not create a completed stay in Trip Log. To finish, return to the last step and choose Save Entry, then wait for confirmation.
Screenshot: start a campground entryUse the numbered steps, Back, and Next to move through the form. This example deliberately leaves GPS unset.
The most useful journal entry tells you what to expect when you return. Use Detailed mode to record more of the following.
Site Details: the correct cost unit, campsite number, ideal site next time, membership used, first/return visit, campground type, distance, pad surface, levelness, and observed power issues.
Amenities: mark the hookups, facilities, and site features you actually used or observed. Add sun/shade information where available.
Connectivity: enable the WiFi, cellular, or Starlink sections that apply. Record quality and measured download/upload speeds; add carrier, ping, and obstruction details where shown.
Ratings & Notes: give the overall rating, return preference, and specific notes. Include helpful arrival advice and bathhouse/laundry observations where those fields are shown.
For a correction after saving, open Trip Log → Edit, change the relevant step, then go to the final step and choose Update Entry. The edit wizard groups some fields differently from New Entry.
Optional Magic Notes Pro
To use the notes drafting tool, opt in through Account → Settings & Security → Trip Entry Settings → Enable Magic Notes and save. When available in an entry, use its notes control, review the proposed text, and save only what accurately describes your stay.
Magic Notes sends selected entry details to the configured AI provider. Review the consent text before enabling it. It is optional; you can always write and edit your own notes.
Search by campground name or physical address. Check that the result is the correct location, especially when names are similar.
For an unlisted site, enter the location details and GPS latitude/longitude manually. Keep directions such as “use the south entrance” in the address/access notes.
Use Get My Location or Get Current Location only while you are at the place you want to record. Your browser will ask for location access. Check the result before saving.
After saving, open the stay to review its location. When coordinates are available, RV Log may add location information such as elevation and weather. Availability depends on the location and service response.
With Pro, open Trip Log → View Map to explore saved locations. A stay without GPS coordinates cannot be plotted at an exact location.
Calculate from Last Stay can help fill distance traveled. Review the result: a calculated distance may differ from the route you drove. Enter your actual distance if needed, and use the units displayed beside the field.
Location permission records your device’s position, which may be your home or current parking spot rather than the campground. You can decline permission and enter coordinates yourself.
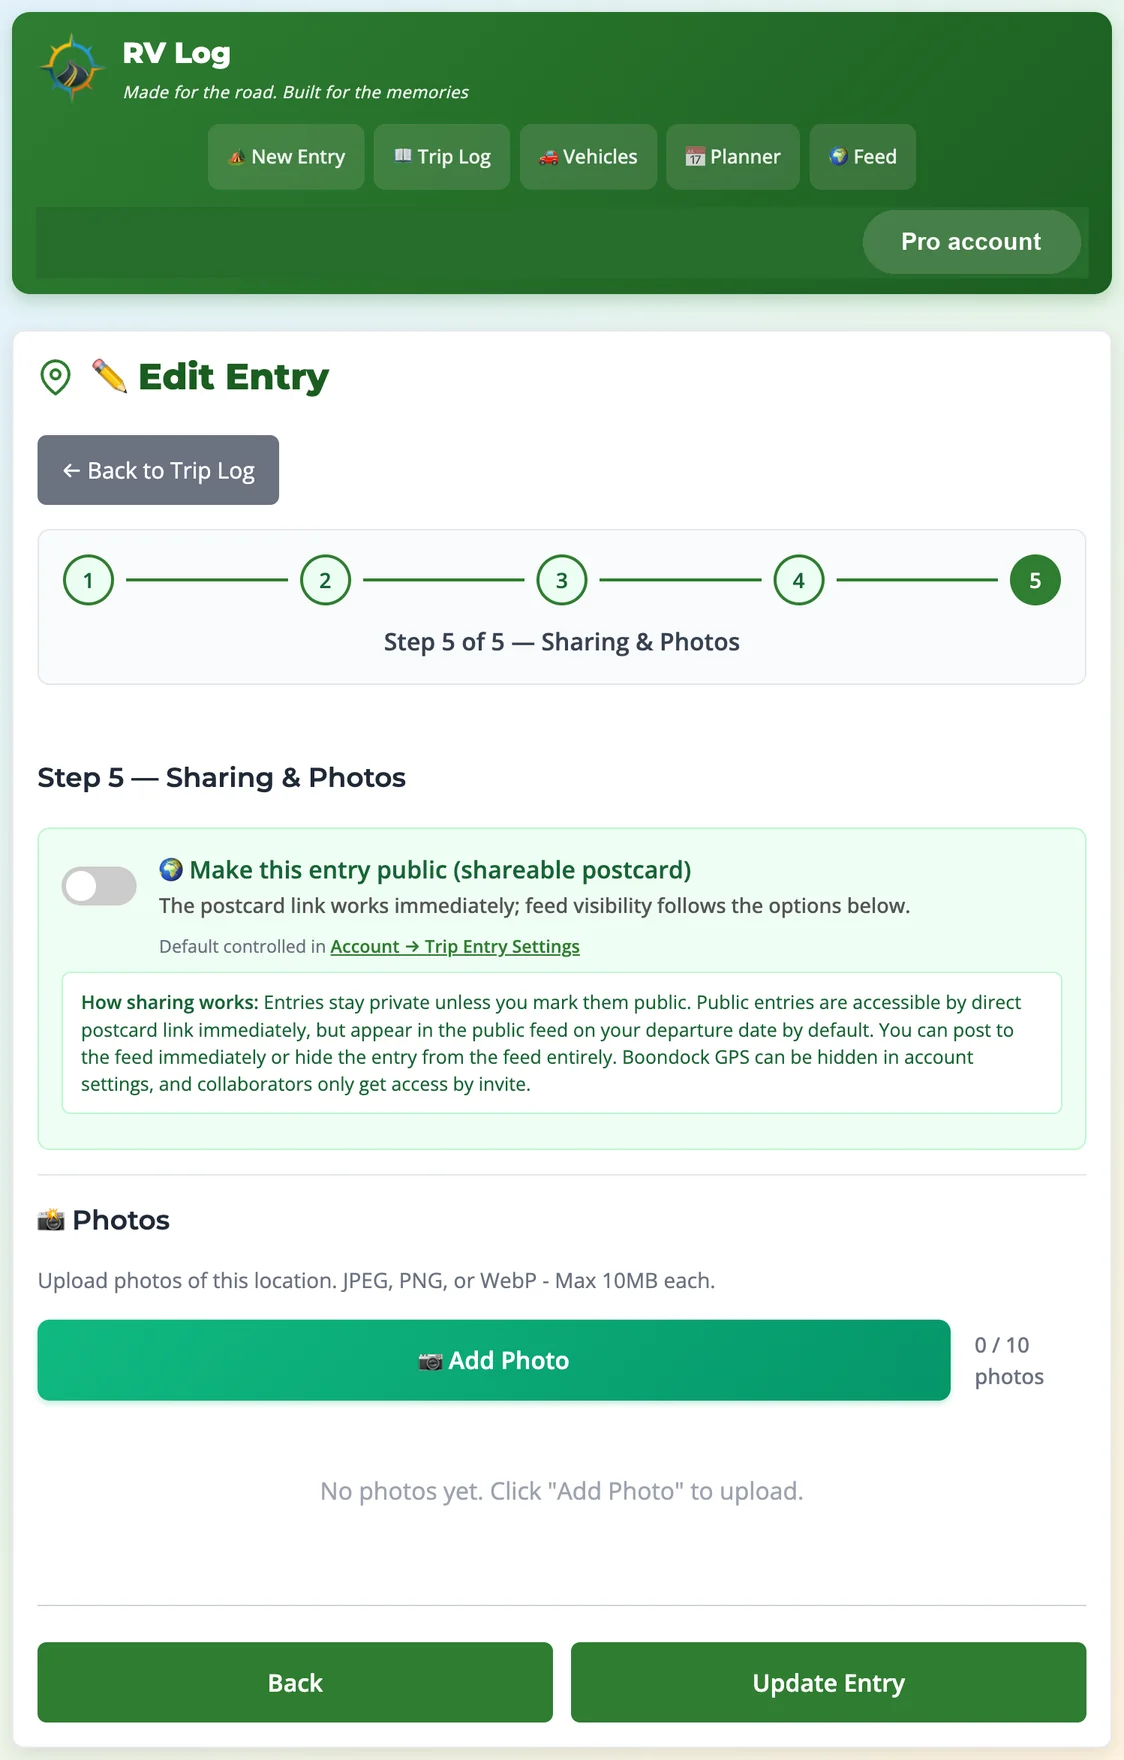
Save the stay first. Open Trip Log → Edit → Sharing & Photos, or select the add-photos-after-saving option while creating a stay.
Choose Add Photo and select an image from your device. The trip photo form accepts JPEG, PNG, or WebP, up to 10 MB per image.
Wait for upload completion and confirm that the thumbnail appears. Check the photo count before adding another image.
Use the photo controls to reorder or delete uploaded photos when available. Check the thumbnail before confirming a deletion; photo removal is not the same as moving a stay to Trash.
Use Trip Log → Photos to browse the gallery of entries you can access.
Free includes 100 MB total photo storage. Pro allows up to 10 photos per stay and unlimited total storage, while per-image restrictions still apply. On a shared entry, photo limits and storage follow the entry owner’s account.
Screenshot: photo upload and sharing settingsA Pro entry has ten photo slots. Uploading a photo does not by itself turn a private stay public.
If a phone photo is in HEIC format and the form rejects it, export a JPEG copy. Trip photos also have a 24-megapixel resolution limit. If an upload fails, check format, file size/resolution, remaining slots, and total storage before retrying.
A postcard shares one stay. A public profile provides a public page for eligible entries. Collaboration gives a trusted person access to your private log; see collaboration before inviting anyone.
Share one stay as a postcard
Open the stay in Trip Log → Edit → Sharing & Photos.
Turn on Make this entry public. Review the option to include notes, whether the entry may appear in the feed, and whether feed posting should happen immediately or at departure.
Choose Update Entry. Open the entry’s public-sharing section and copy its postcard link.
Open that link in a signed-out/private browser window. Review the notes, photos, dates, and location as a visitor would see them before sending it to anyone.
The direct postcard link works immediately after the stay is made public. Hiding a public stay from the feed, or waiting until departure to show it there, does not make the postcard private.
Enable Public Profile, review the available URL and privacy options, and save.
Use Hide Exact GPS for Boondocking when you want coordinates omitted from public boondocking stays. Review your public page after saving.
Enabling a profile does not publish all private entries. Mark individual entries public and review their feed choices. Keep sensitive details out of public notes and photos even when location controls are enabled.
Stop sharing
Edit the stay, turn off Make this entry public, and save. Disable Public Profile separately if you no longer want a public profile page. Also review any public road trips containing the stay; their sharing is controlled separately. Changes cannot recall screenshots or copies someone already made.
Use Find Travelers to search by username/name, or browse Suggested Travelers.
Choose Follow on a traveler’s available public profile. Their eligible public posts can appear in your feed.
Open Following to review the people you follow and choose Unfollow when you want to stop. Followers shows people following you.
Following someone does not grant access to their private log. If your feed is empty, follow a traveler with public posts; they may also have chosen to wait until departure before posting.
In Trip Log, locate the stay and choose Delete. Read the confirmation to check that you selected the correct stay.
To recover a deleted stay, open the account menu → Trash.
Find the stay and choose Restore within the 30-day retention window. Only the owner can restore or permanently remove their stays.
Check the restored entry. Restored stays are private; review sharing before making them public again.
Delete forever removes the stay and its photos permanently. It cannot be undone. The 30-day stay recovery window does not mean that deleted photos, vehicles, expenses, or accounts have the same recovery option.
Enter the required year, make, and model. Add a nickname such as “Our motorhome” so it is easy to select later.
Choose a vehicle type if useful. Select the fuel types it uses: Diesel, DEF, Gasoline, and/or Propane. A trailer that does not use fuel can leave those unchecked.
Choose Add Vehicle. Return to Vehicle Tracker and select it from the vehicle list.
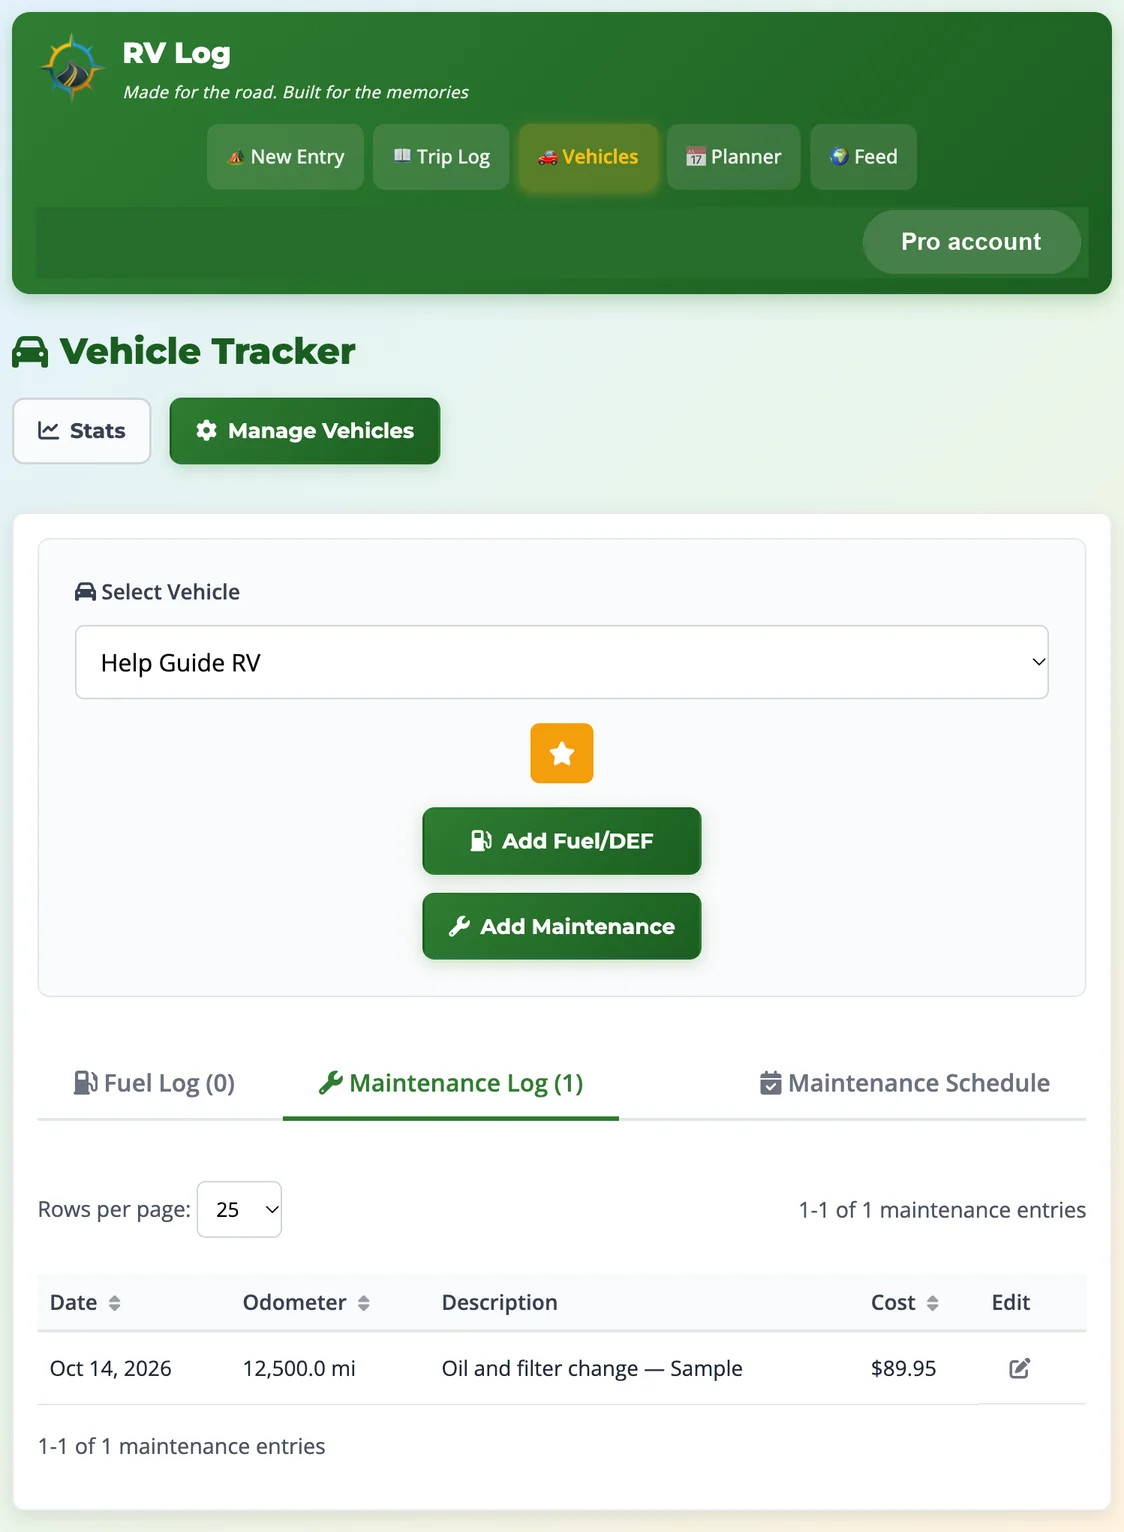
Use the star button to set the selected vehicle as your default. Check the selected vehicle every time you add fuel, service, or a reminder.
Use Edit in Manage Vehicles for corrections. Retire keeps an old vehicle out of the active selector; use Show Retired Vehicles to find it again. Prefer retiring a vehicle when you want to preserve its history. Read any delete confirmation carefully before removing a vehicle.
Screenshot: vehicle tracker with a maintenance recordFuel Log, Maintenance Log, and Maintenance Schedule belong to the selected vehicle.
Free accounts can view existing vehicle records but need Pro to add or edit their own. Shared vehicle access also depends on the owner’s subscription and your collaboration permissions.
Open Vehicles, select the correct vehicle, and choose Add Fuel/DEF.
Enter the date and odometer in the units displayed. Choose a fuel type supported by the selected vehicle.
Enter the cost and choose whether it is a Total or per-unit cost. Enter the amount purchased in the displayed gallons/liters unit.
If appropriate, select Skip fuel economy calculation for this entry, for example for a partial fill-up.
Add notes if useful, then choose Save Fuel Entry. Check the Fuel Log and use its edit control to correct a record.
Fuel economy needs suitable consecutive readings. A first record, partial fill, skipped calculation, or incorrect odometer can explain a missing/unexpected result. DEF and propane do not generate MPG calculations. Check the cost type if a total looks too large or small.
Open Vehicles, select the correct vehicle, and choose Add Maintenance.
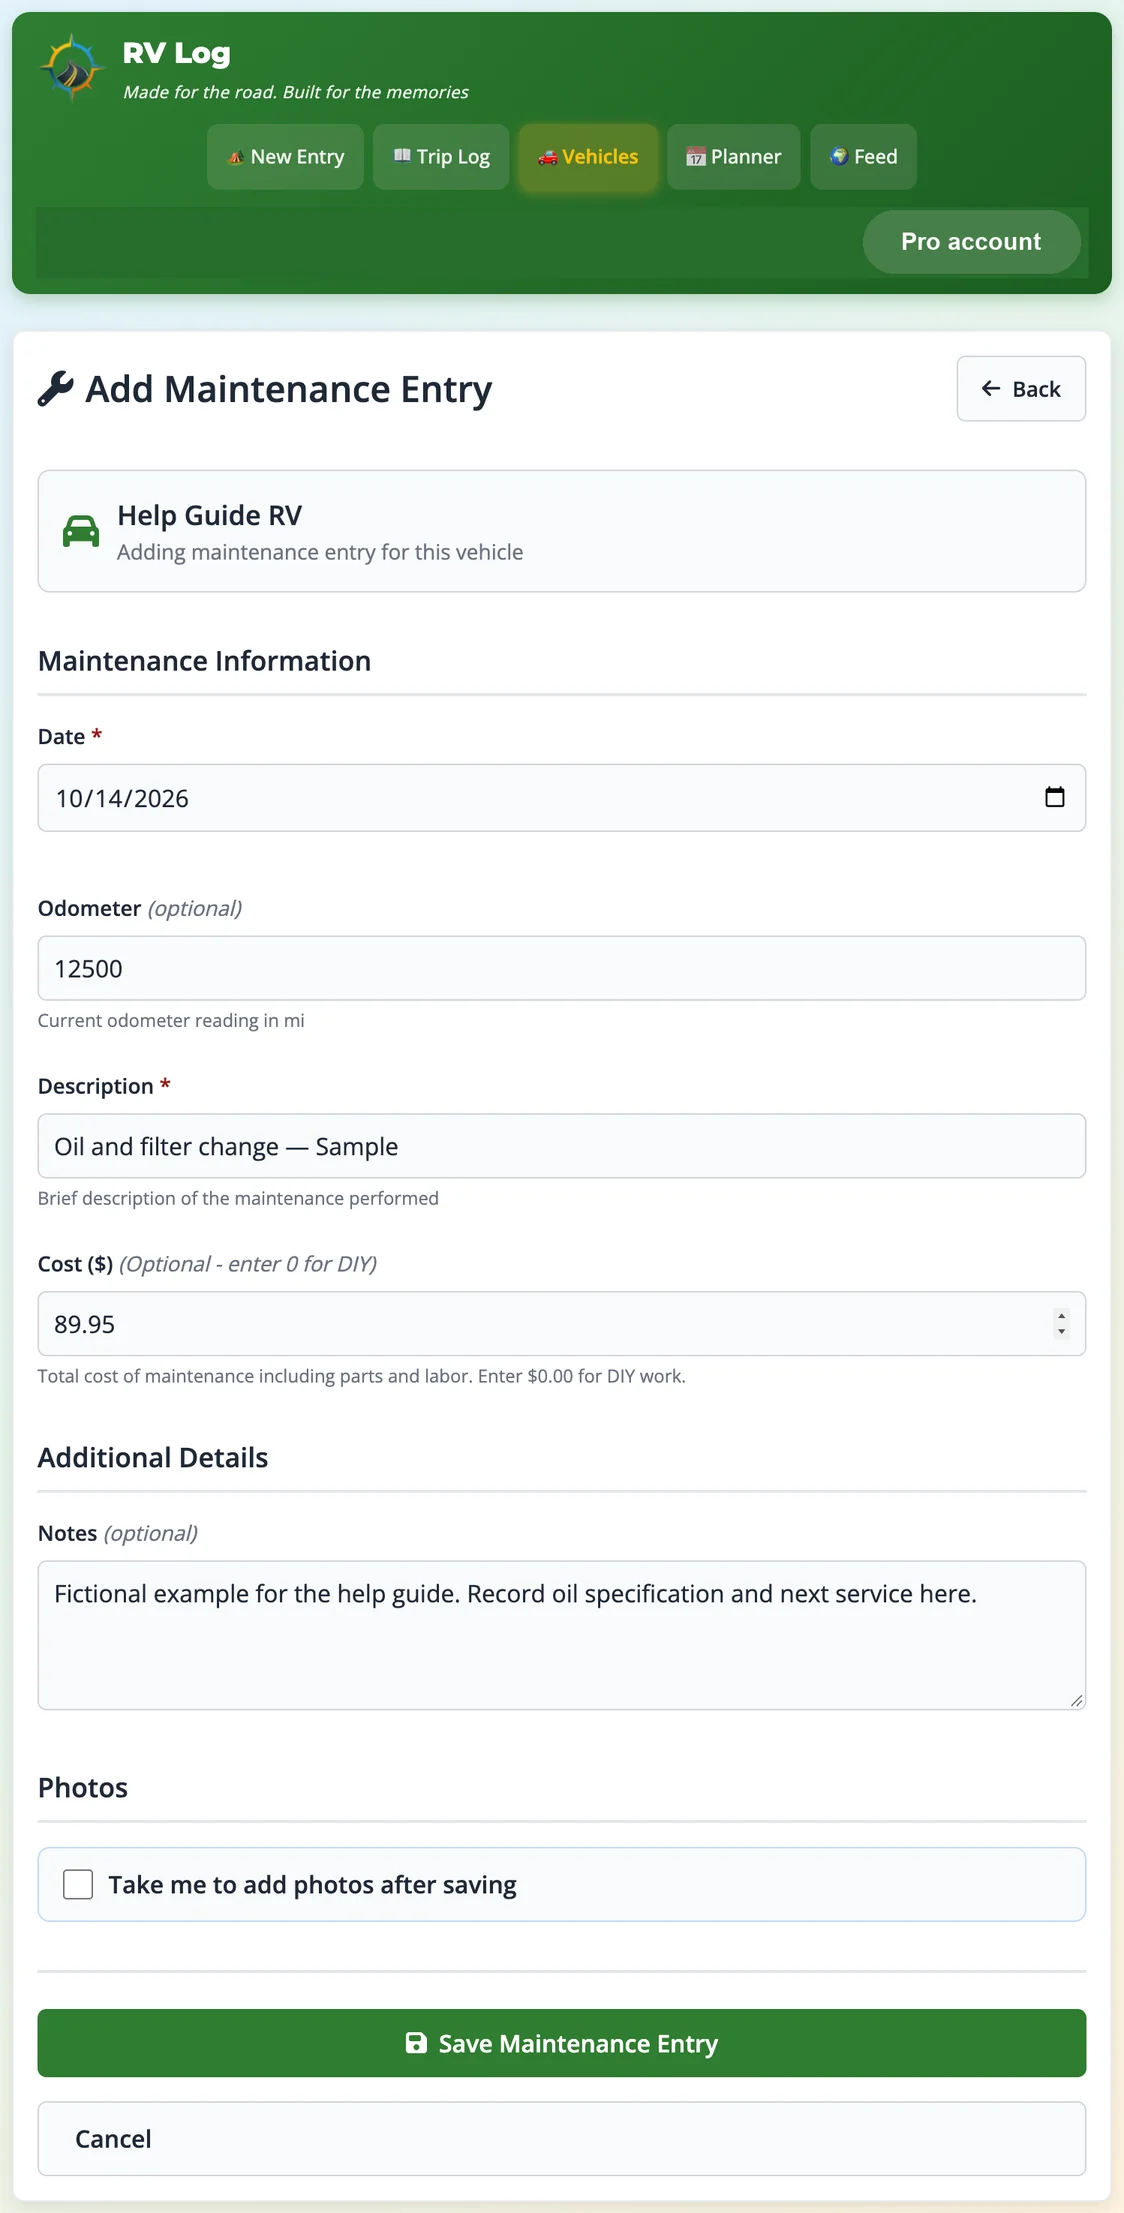
Enter the actual service date and a clear description such as “Oil and filter change.” Add the odometer if known.
Enter the service cost. You can enter zero for DIY work. In Notes, record the parts, specifications, shop, or warranty details you want to find later.
Select Take me to add photos after saving if you want to attach photos or a receipt image.
Choose Save Maintenance Entry. Check the Maintenance Log for the selected vehicle and use its edit control for corrections.
Screenshot: an example maintenance entryUse your actual service details. This fictional example illustrates the form, not a recommended service interval.
Open Vehicles, select the vehicle, and choose Maintenance Schedule.
Choose the add-reminder control. Enter a description of the service.
Choose Mileage-based, Time-based, or Both (whichever first). Enter the interval values requested by the form.
Record the date and/or odometer when the work was last completed. Use the service interval specified for your vehicle or equipment.
Add notes and choose Create Reminder. Review the due information in Maintenance Schedule.
When work is done, use the reminder’s completion action and record the actual completion details. Edit the reminder if the schedule changes.
Keep odometer and completion records up to date. Check Maintenance Schedule directly rather than relying only on an email notification. A maintenance log entry and a reminder are separate records; review both after service.
Open the account menu → Expenses. Confirm the profile if you share logs.
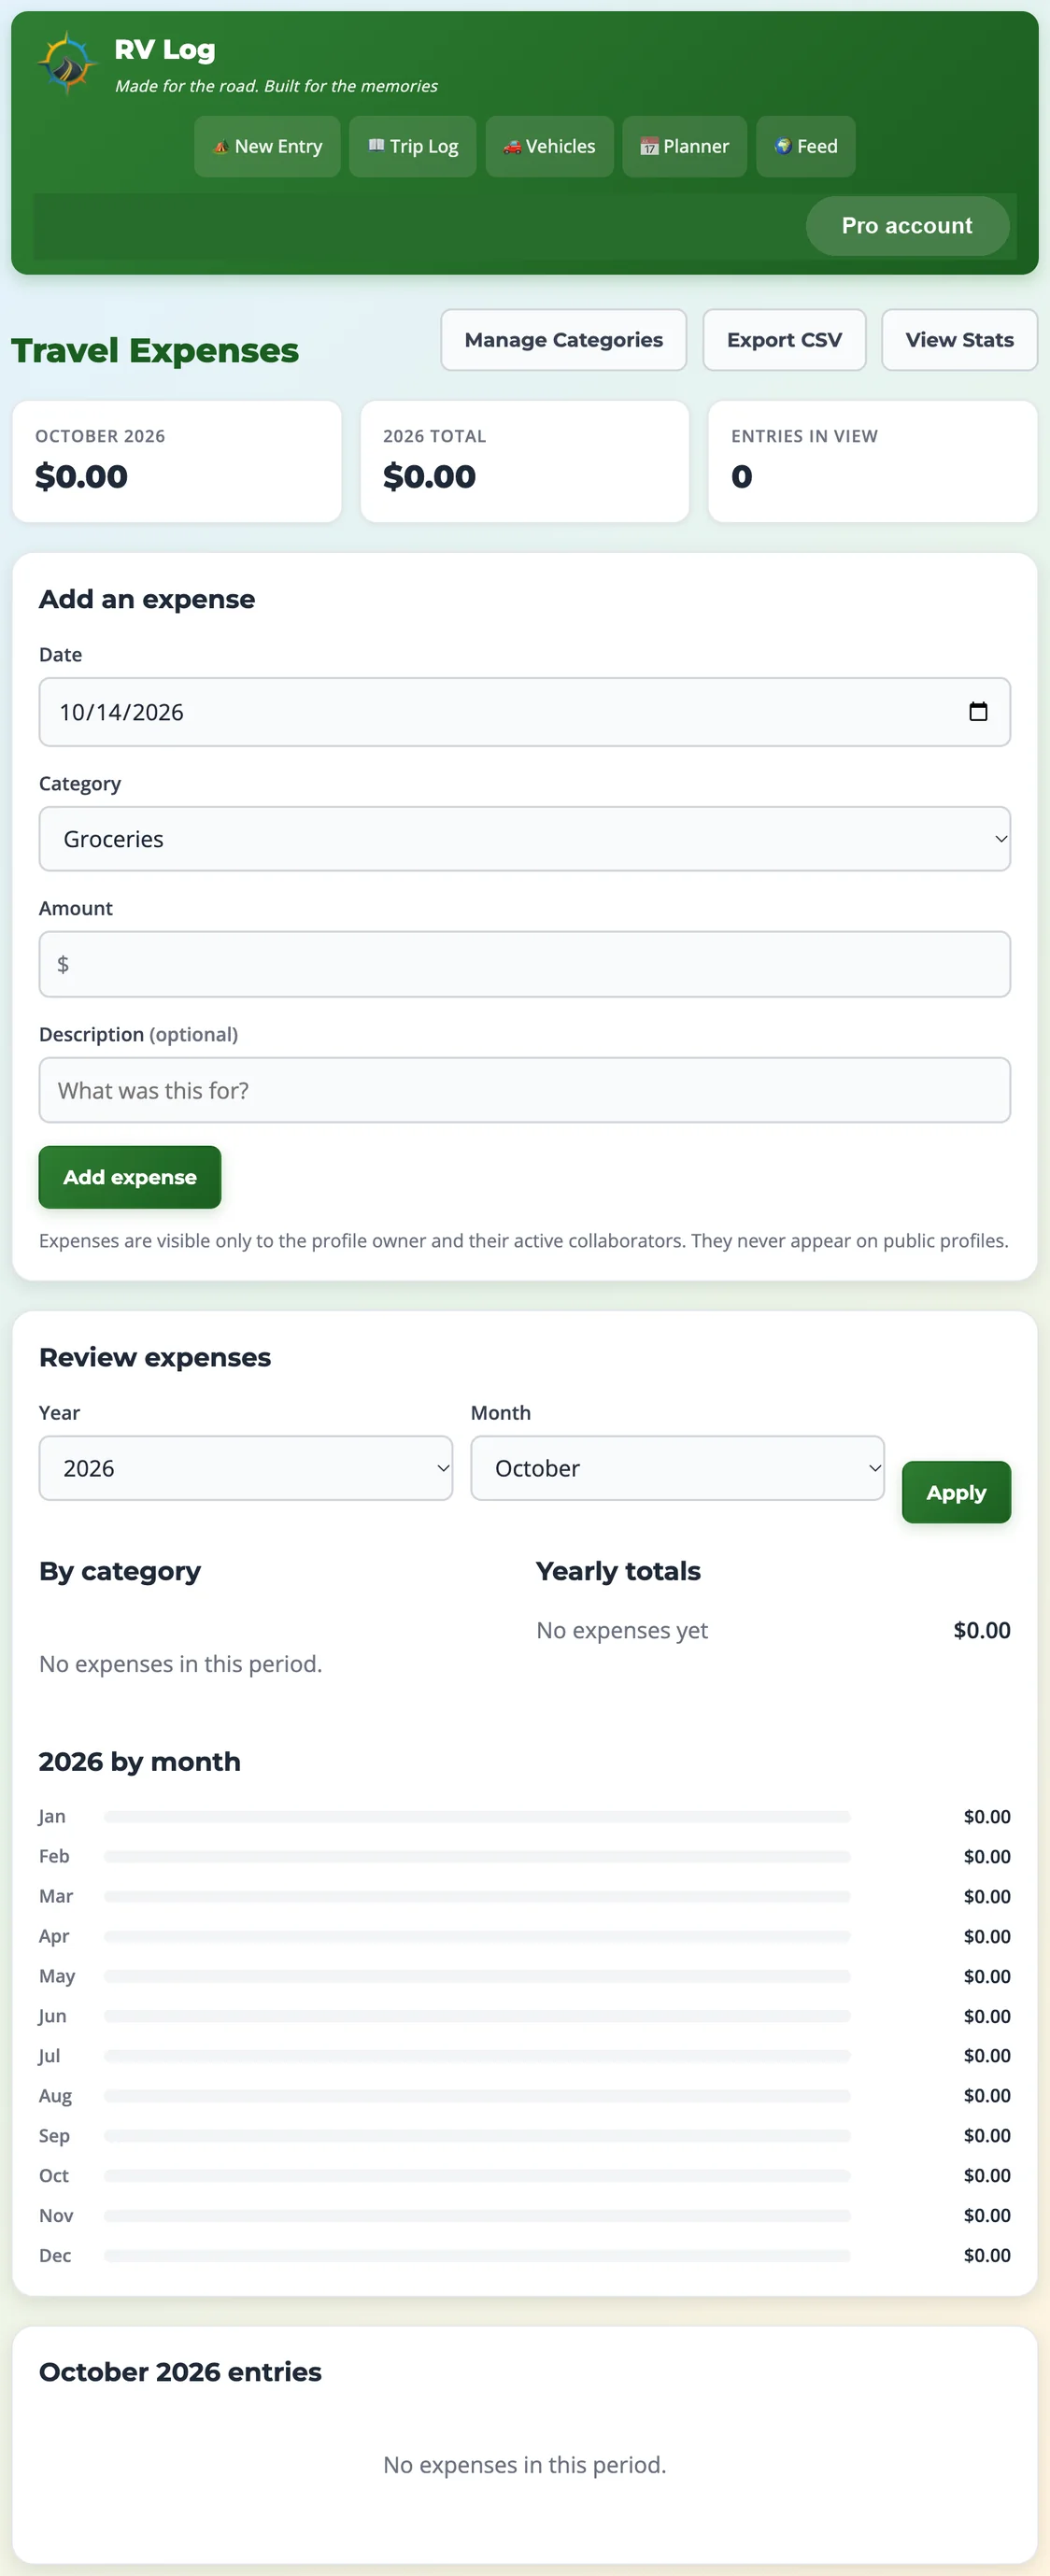
In Add an expense, choose the date, category, and amount. Add a short description if useful, then choose Add expense.
Use Manage Categories to maintain your category choices. Choose a useful category before saving each expense.
Under Review expenses, select the year and month and choose Apply. Review the totals, category breakdown, and individual entries.
Use an entry’s available edit/delete controls for corrections. Choose Export CSV to download expenses for the selected period/profile.
Screenshot: the expense entry and review pageExpenses are private to the owner and active collaborators; they do not appear on public profiles.
Campground costs, fuel, and maintenance have their own record types. Avoid entering the same purchase twice if you are comparing combined spending. Detailed statistics may require Pro even when expense entry and CSV export are available on Free.
Use the summary at the top of Trip Log for stays, nights, distance, and stay cost. Check active filters when interpreting the totals.
Choose Stats for detailed travel statistics. Set the available year/profile filters to the records you want to review.
Use Export to PDF or Export to CSV on the statistics page when you want a copy.
For vehicle statistics, open Vehicles, choose the vehicle, then Stats. Review fuel and maintenance records if a calculation seems wrong.
In January, open Year in Review for the previous year’s recap. The annual recap is available to signed-in account owners in January; outside that window it may return an unavailable page.
Record actual dates, distance, fuel quantities, and cost units to keep summaries useful. A nightly cost and a total-stay cost are different inputs. If an upgrade screen appears, check Subscription and the selected profile.
Use the Planner for future stops and possibilities. A planner entry is not a reservation and does not automatically become a saved campground stay.
Choose Add New Board or Add Your First Board. Give it a name such as “Weekend Getaway,” choose a header color/width if desired, and save.
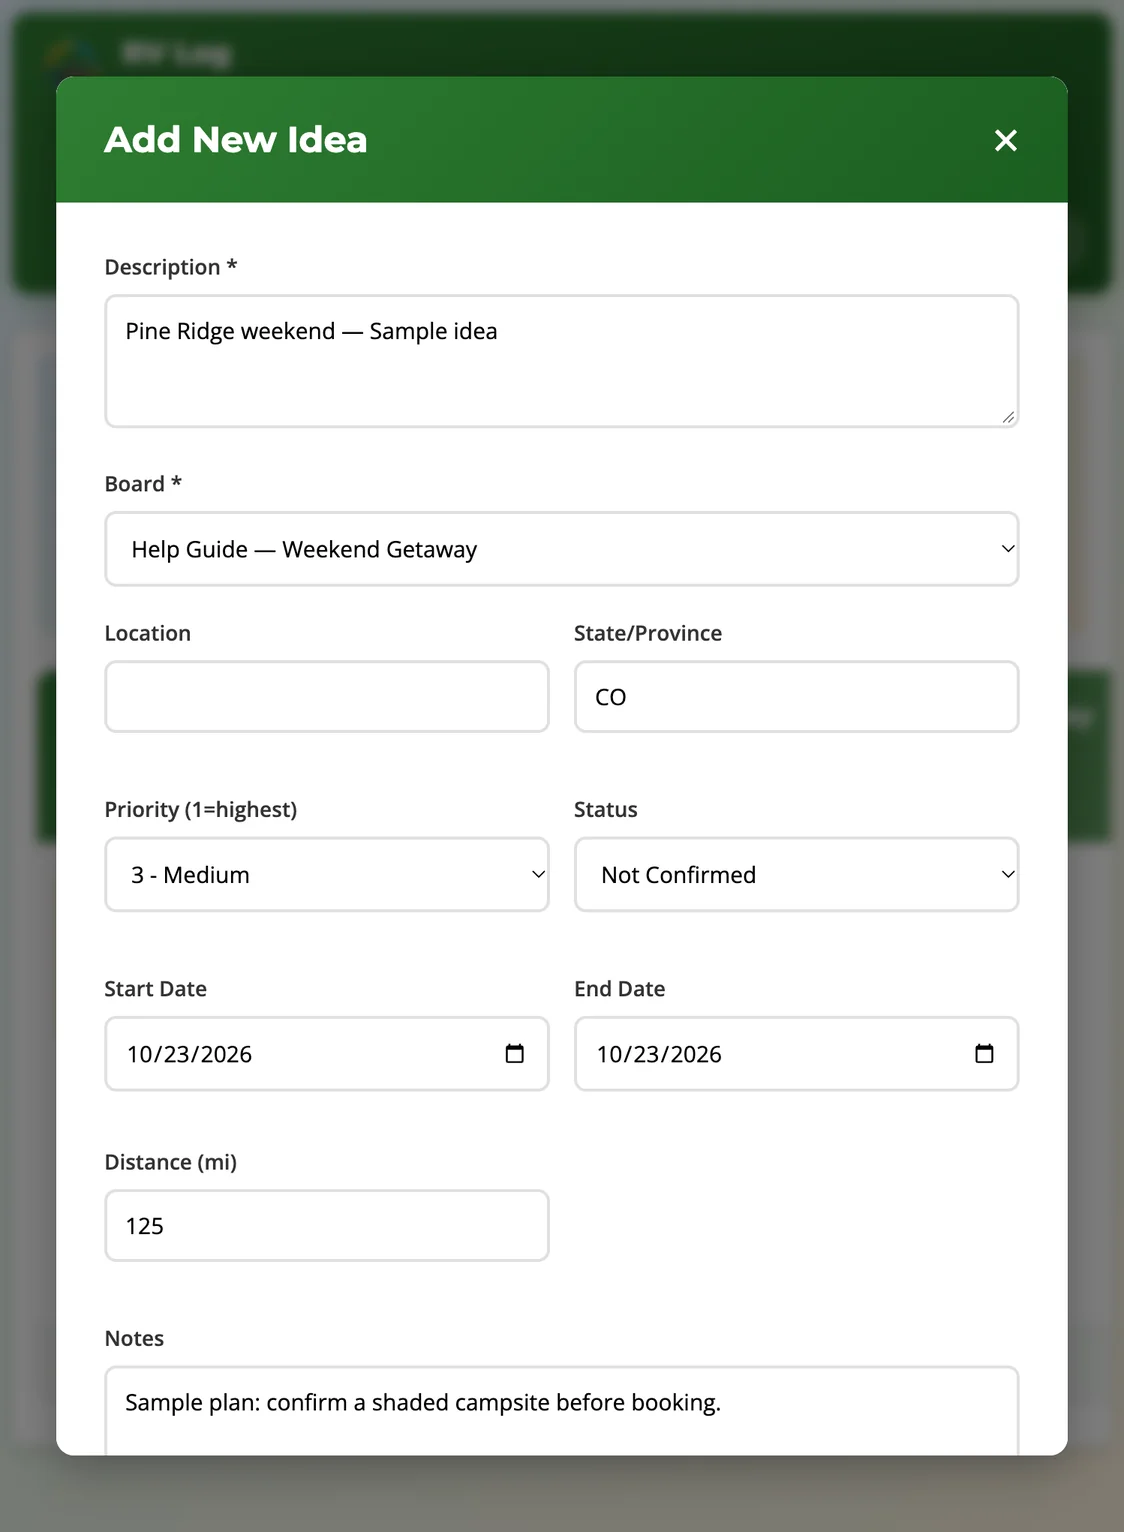
Choose Add New Idea, or the add-item button on a board. Enter a description and select the board.
Add a location, state/province, priority, status, dates, distance, and notes as needed. Priority 1 is highest. Check the end date if you change the start date.
Choose Save. Open the idea again to edit it. Use board organization controls to rearrange ideas; unlock drag-and-drop if the board is locked.
Use Calendar View to see dated ideas. If an old idea is missing, choose Show Past Dates.
Open the board’s More board actions menu for available PDF/calendar exports. An idea’s Add to Calendar downloads a calendar file you can import into your calendar app.
Screenshot: create a planner ideaDates place an idea on the calendar; its board organizes it with related plans.
Calendar-file imports are snapshots, not continuous synchronization. Export/import again when plans change, checking for duplicates. Review delete confirmations in Manage Boards, especially for boards containing ideas.
Save the individual campground stays in Trip Log first.
Open the account menu → Road Trips → Create New Road Trip.
Enter a custom title, or leave it blank for an automatic title. Select up to 50 stays. A date range can automatically select stays entirely within that range; review and deselect any you do not want.
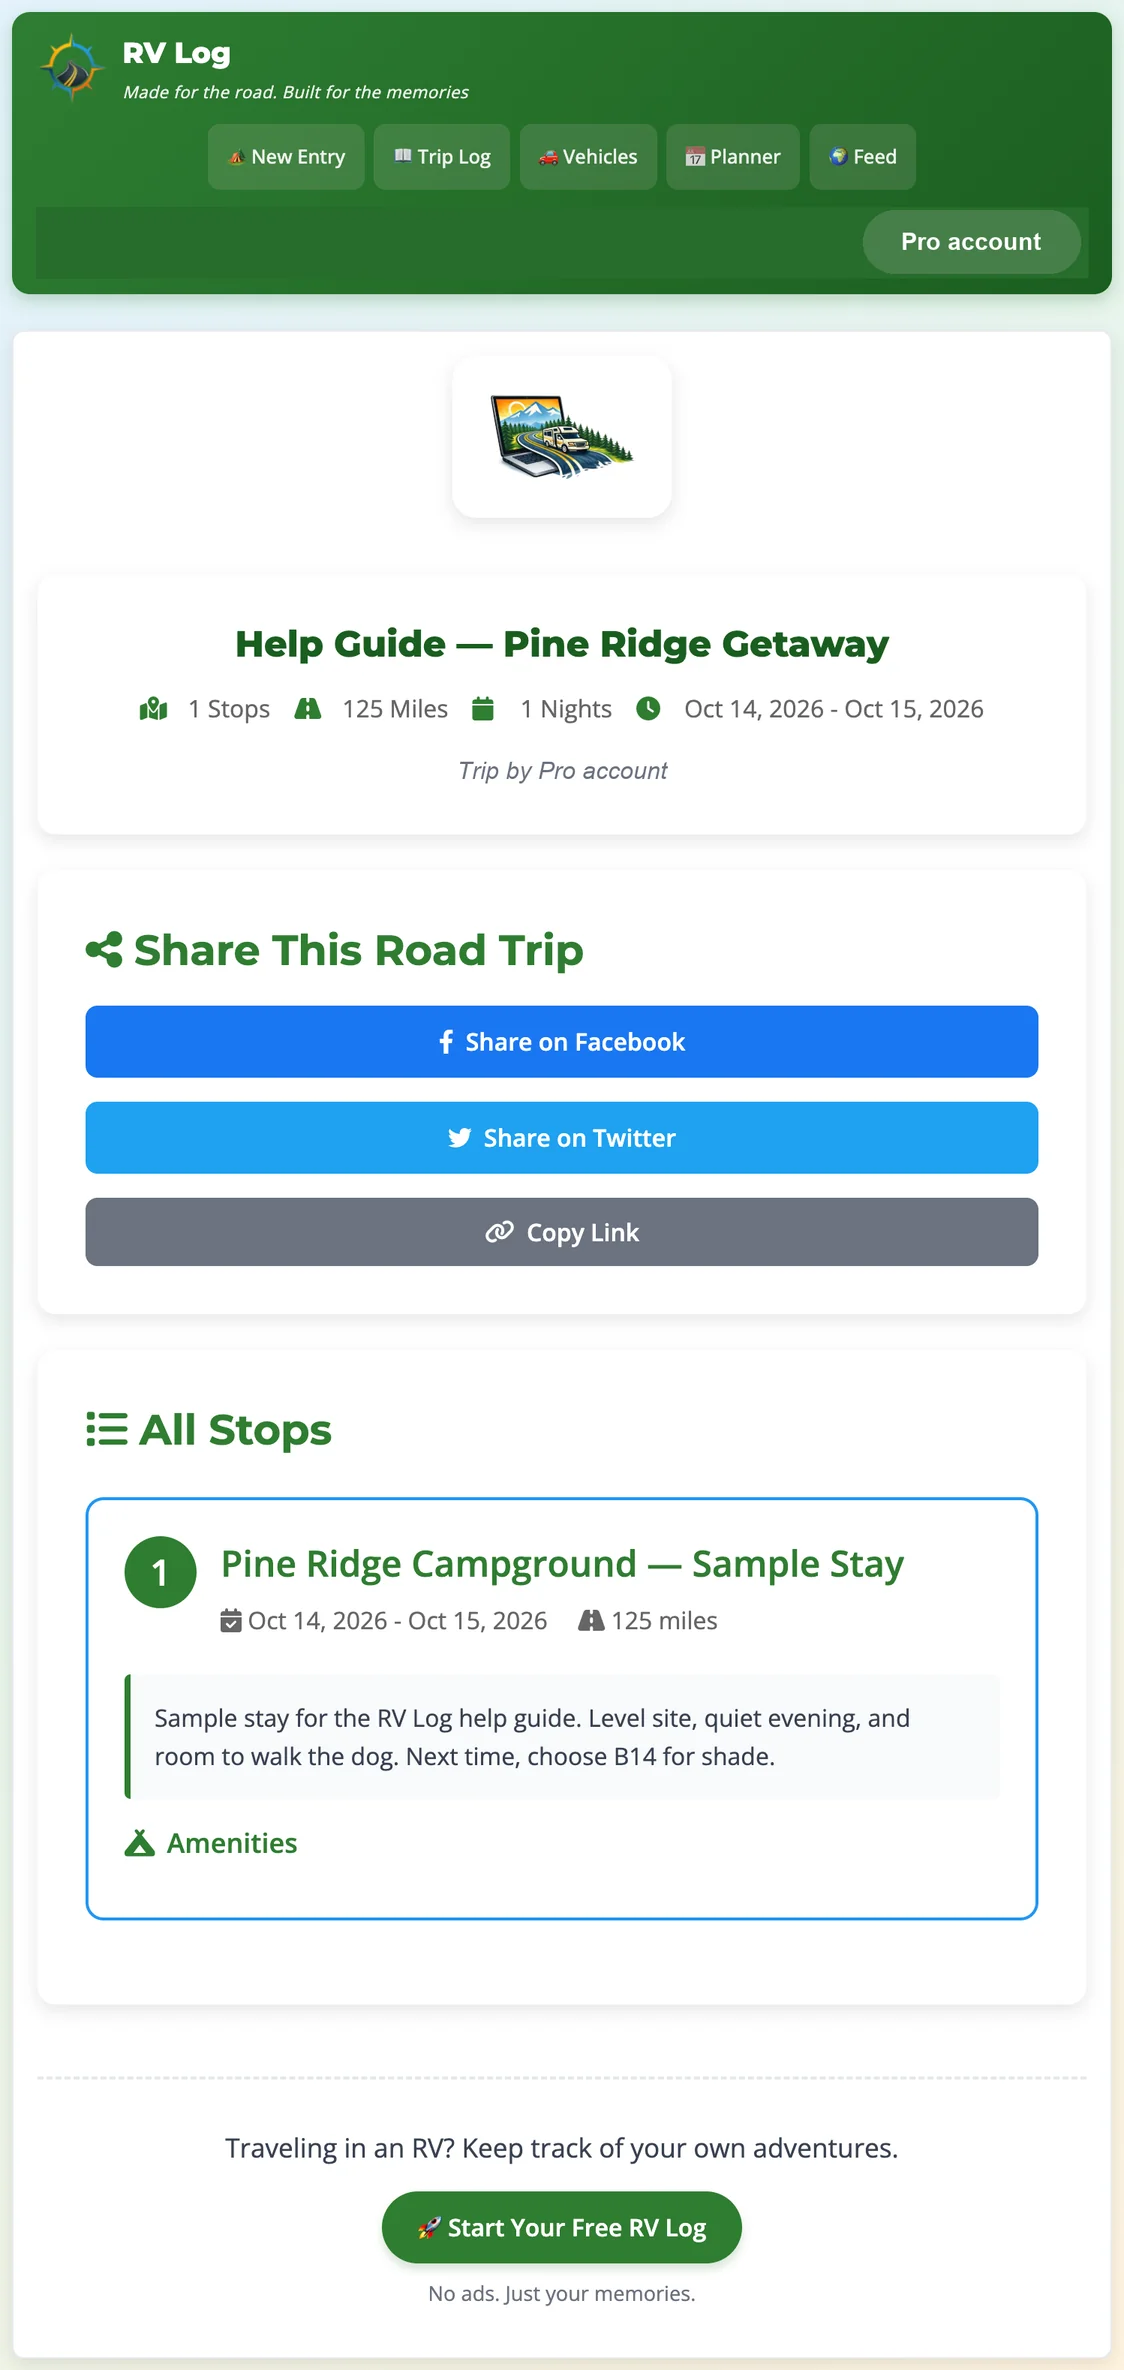
Choose Create Road Trip. It starts private. Use View to review the grouped journey or Edit to change the title and included stays.
If you intend to share it publicly, enable your Public Profile, mark the individual stays you want visitors to see public, and review their notes/GPS choices. Then choose Make Public on the road trip. Use Copy URL and check the link in a signed-out/private window before sending it.
Choose Make Private on the road-trip card to stop public road-trip access.
Screenshot: a road trip built from a saved stayThe owner can preview a private road trip. Sharing buttons in that preview do not mean a private link is readable by visitors.
Visitors need both a public road trip and an enabled public profile. They only see included stays that are individually public; the owner’s preview can show private stops that visitors cannot see. Feed-hidden public stays can still be visible through the road-trip link. Review the signed-out view and manage road-trip visibility separately from individual postcards.
Open the account menu → Checklists. Confirm the profile you want to work in.
Choose Start on a default arrival/departure list or one of your personal lists.
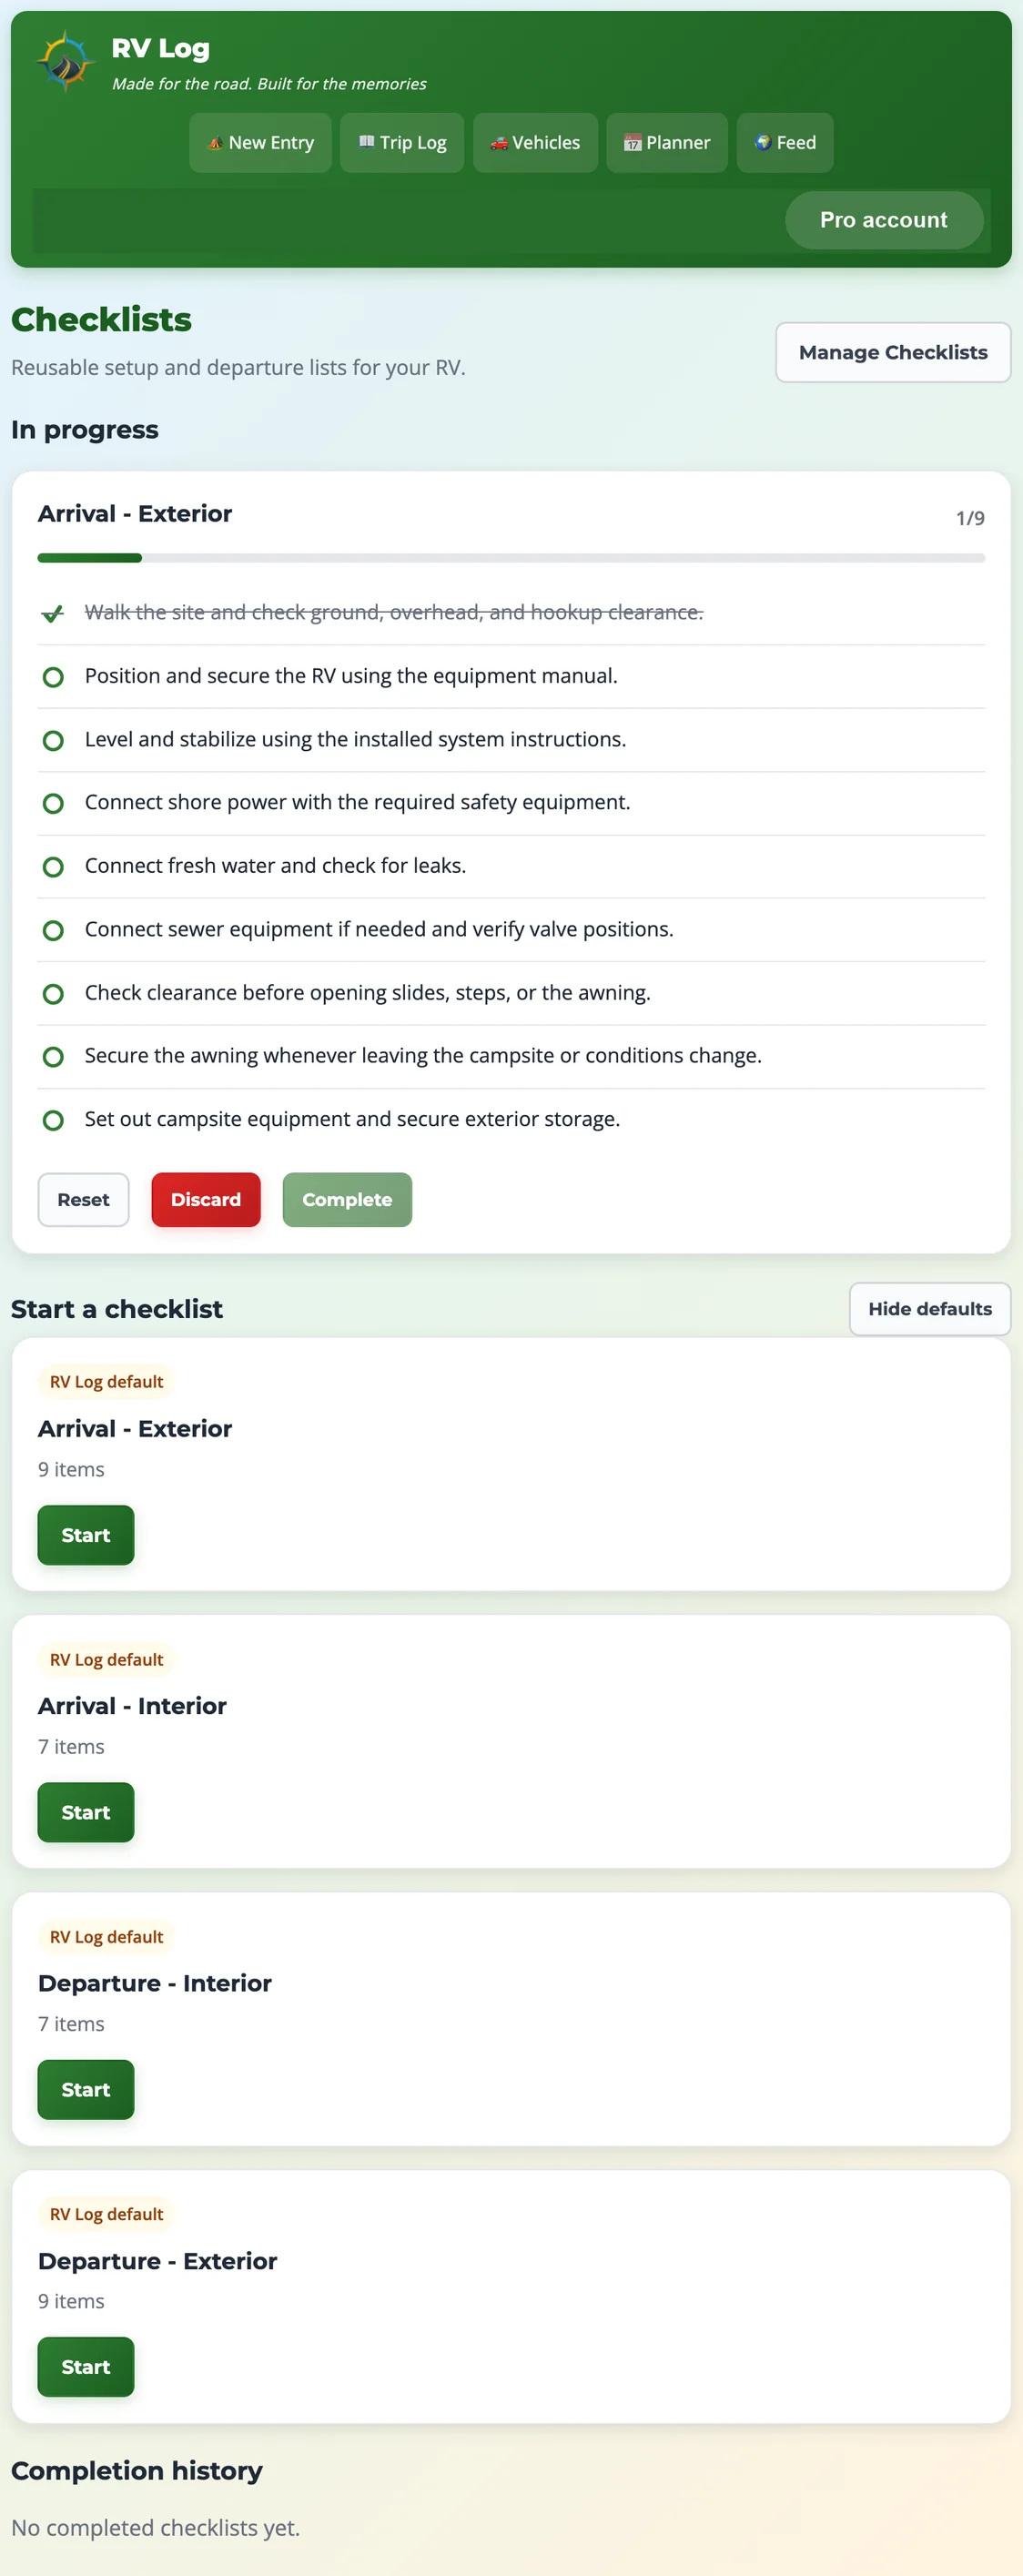
Tick each item as you finish it. Progress is saved under In progress, and collaborators with the required access can work on the same list.
After all items are checked, choose Complete. A receipt appears in Completion history.
Use Reset to clear checks on an active run, or Discard to remove that run. Read the confirmation before proceeding.
Create a reusable personal checklist
Choose Manage Checklists.
Give the list a name and enter one item per line, in the order you want to perform them. Save the checklist.
Return to Checklists and choose Start to begin a fresh run. Manage Checklists edits templates; the main checklist page handles current progress.
Screenshot: a checklist in progressComplete becomes available once every item is checked. Start a new run for the next arrival or departure.
Use your equipment instructions and adapt personal lists to your RV. A checklist records progress; it cannot verify that equipment is safe or correctly operated.
A collaborator can see private entries and can add/edit entries and manage photos. Invite only someone you trust with your log. Following a traveler and sharing a postcard grant different access.
The log owner opens Account → Collaboration → Generate New Invitation Code.
Send the invitation code privately to the intended person. Check any expiry/use limits shown beside the code. Do not publish a real invitation code in a profile or postcard.
The invited person signs in to their own account, opens Account → Collaboration → Join Another Log, enters the code, and chooses Join Log.
On pages with a profile selector, choose the shared log before working. Check the profile again when moving between trip entries, vehicles, expenses, planning, and checklists.
The owner can use Remove under Users with Access to Your Log. Use Revoke on an invitation to prevent future use. A collaborator can choose Leave under Logs You Have Joined.
Each log supports up to four collaborators. Pro tools still require an eligible account/profile and the relevant permissions; joining a log does not make every account independently Pro. Revoking an unused code and removing an existing collaborator are separate actions.
Open Account → Settings & Security. Use your own account; do not share passwords with a travel partner. Use collaboration instead.
Change password: enter your current password, the new password, and its matching confirmation in Change Password. Submit the form. Use Forgot Password on the login page if you cannot sign in.
Change email: enter your current password and new email address, then choose Send Verification Email. Your current email stays active until you confirm the link sent to the new address.
Authenticator app: choose Enable OTP and follow the setup instructions in your authenticator app. Keep any recovery information private.
Passkeys: enter a passkey name and your current password, choose Add passkey, and complete the device/security-key prompt. In RV Log, a passkey is a second step after your password.
Two-factor sign-in: you can enable either supported method or both; at sign-in you need to complete one available second step.
Legacy Contact: review the description in Settings & Security, enter the intended person’s name/email if you want to use it, and choose Save Legacy Contact. Only add a person you trust.
Use Logout on shared devices. Do not include passwords, authentication codes, recovery codes, or reset links in support requests.
Open Account → Settings & Security → Data Export → Export Your Data.
Choose Trip Data Only (CSV) for trip data, profile information, and statistics, or Trip Data + Photos (ZIP) to include photos.
Read the photo-export notice before requesting it. The self-service photo export is limited to the most recent photos up to 100 MB; a large photo collection may require a complete export through support.
Wait for processing. Check Recent Exports and the ready notification email. Download before the expiry date displayed on the export.
Open the downloaded archive and check its contents before relying on it as a backup. Store it somewhere private.
Pro’s unlimited photo storage and the 100 MB self-service photo-export limit are different limits. A photo ZIP may be partial even on Pro. Separate statistics, expense CSV, vehicle, and planner exports are available from their respective pages; check the selected profile and filters before exporting.
Download links can grant access to private data. Keep links, CSV files, and ZIP archives out of public posts and screenshots.
Open Account → Subscription. Review the current plan, trial/access dates, and available features.
To upgrade, compare the options and choose the one you want. Review the price, renewal terms, and payment details on the checkout screen before confirming a purchase.
Use the account’s available billing-management control for a web subscription. If your subscription was purchased through Apple, manage it through the Apple subscription controls shown for that purchase.
After a purchase or cancellation, return to Subscription and check the resulting status and access end date. Contact support if the displayed state does not match your purchase.
Monthly/yearly Pro renews according to its purchase terms. Lifetime is a one-time website option; the app offers monthly and yearly Apple subscriptions. See app purchases and restoration. Cancellation and account deletion are different actions. Free remains available for the core trip journal after trial/paid access ends. Do not assume a plan change deletes records or cancels a subscription purchased through another provider.
Open Account → Referrals to find your referral code/link and the current reward conditions. Copy the link when you want to invite a new member.
To suggest a feature, use the account menu → Feature Ideas. Review existing suggestions before submitting your own, and use the available voting controls.
For account help or a bug, open Account → Support or use Contact.
Describe the action you took, what you expected, and the error you saw. Include your device/browser and a redacted screenshot when useful. Avoid private trip details unless they are necessary to explain the problem.
First review any active subscription and follow the billing-provider instructions. Save any data/photos you want to keep using Data Export, checking whether the photo export is partial.
Read the deletion explanation, complete the required verification, and submit only if you intend to permanently remove the account.
Deleting your account does not cancel an Apple subscription; cancel it through Apple first. Account deletion is permanent. It is different from deleting one stay, clearing a filter, logging out, or canceling a subscription. The stay Trash recovery window does not restore a deleted account.
Check username/email and password, complete security verification, and confirm your email was verified. Use Forgot Password if necessary. If a second step is enabled, use one of your configured methods.
Security verification keeps spinning.
Wait for the check to finish. Make sure JavaScript and necessary cookies are allowed. Reload and try again; a browser extension may be blocking verification. Do not repeatedly submit while the check is unfinished.
A stay or planner idea is missing.
Check the selected profile, clear filters, and look through other result pages. For plans, show past dates. Check the appropriate Trash page if you deleted the record.
I can see a shared record but cannot edit it.
Check that you selected the intended profile, that collaboration is still active, and that the required Pro access and permissions are available. Ask the owner to review access.
A photo will not upload.
Check file type and the 10 MB trip-photo limit. Check photo slots and the owner’s total storage. Try a smaller JPEG and wait for the upload to finish before retrying.
The map is empty or the location is wrong.
Check saved latitude/longitude and the selected profile/filters. A name or access note alone is not an exact GPS location. Correct the entry and save.
A shared link asks someone to sign in or cannot be opened.
Confirm that you copied the public postcard/road-trip link rather than an edit or private-view address. Check the record’s public setting. Test signed out; do not make something public unless you intend to share it.
My public entry has not appeared in the feed.
Review Public Profile, the entry’s public/feed choices, and its departure date. Default feed timing waits until departure. The postcard link can still be live immediately.
Pro tools show an upgrade prompt.
Open Account → Subscription to check access/trial dates, then verify the selected shared profile. If a completed purchase is missing, contact support with the purchase provider and approximate date; do not send payment-card details.
A save fails or the session changed.
Copy any unsaved notes somewhere private, sign in again if asked, refresh the page, and retry. Check for a saved record before submitting a second time to avoid duplicates.
An export is pending or the link expired.
Check Recent Exports and the ready email. Avoid starting duplicate jobs while one is processing. Request a fresh export when the old download has expired, or contact support if processing stalls.
Still stuck? Use Contact or Account → Support, or email [email protected]. Include the page name, steps, device/browser, and exact error text, with sensitive details removed.